Lumi

Phrase-aware lighting automation for DJ sets.
Lumi user guide
Lumi prepares and runs phrase-aware SoundSwitch lighting for the track that is playing and the track that is coming next. This guide covers the shortest path from an empty Lumi library to a working local or Pro DJ Link show.
Before you start
You need:
- an Apple Silicon Mac running macOS 15 or newer;
- a rekordbox OneLibrary USB source containing analyzed tracks;
- SoundSwitch with MIDI input enabled;
- Pro DJ Link-compatible players for Live Decks.
Local Playback, Track Editor and Light Plan preview work without players. Lumi runs locally and does not need internet access during normal use.
To exercise Live Decks without physical players, use the separate Pro DJ Link Simulator on another Mac. It supports two Players, track loops and playlist-driven Auto Mix for longer tests.
1. Install Lumi
- Download the DMG and matching SHA-256 checksum from GitHub Releases.
- Compare the downloaded DMG checksum with the published checksum.
- Finish any active show and quit Lumi. Open the DMG, double-click Install Lumi.pkg and follow macOS Installer. It creates the right folder; no dragging or manual folder setup is needed. Administrator approval may be required.
- Eject the DMG and open Lumi from
/Applications/Lumi. - If macOS blocks the unsigned installer or app, open System Settings → Privacy & Security, choose Open Anyway, then confirm Open.
Production, RC and Dev builds can coexist. They use separate applications, preferences and databases:
An update replaces only the selected channel’s app. Your library, phrases, MIDI mappings and settings remain in place. Licenses, corresponding source archives and build information are in Licenses & Sources inside the DMG.
| Channel | Installation folder |
|---|---|
| Production | /Applications/Lumi/Lumi.app |
| RC | /Applications/Lumi/RC/ |
| Dev | /Applications/Lumi/Dev/ |
Only download a build from the official Lumi repository. The public build is currently distributed outside the Mac App Store and is not Apple-notarized.
2. Synchronize a trusted USB source
Open Library → Import & Sources.
- Choose Add USB Source and select a mounted rekordbox OneLibrary USB.
- Let Lumi scan the source. The scan is read-only.
- Expand the source and select only the playlists you want in Lumi.
- Review the impact counts and any track-level differences.
- Synchronize the selected playlists.
Lumi remembers each physical USB source independently, including two media devices with the same make and model. Reconnecting a trusted source refreshes its status without merging its identity with another device.
On a writable USB, registration can create a tiny .lumi-media.json file with
Lumi’s versioned media identity. It contains no music, phrases or credentials.
Rekordbox databases and analysis files are never modified. A read-only USB can
still be scanned; unavailable or ambiguous identity is reported rather than
silently treating two devices as one.
Scan counts are an initial comparison. Synchronization verifies the selected audio and analysis revisions before committing; changed source files require a fresh scan. Wait for the source’s completion report before ejecting the USB. If a playlist was moved to another folder in rekordbox, select its new location again rather than assuming the old numeric playlist ID still identifies it.
When a track differs from the Lumi copy, the review view shows the evidence Lumi can compare: file data, beatgrid, waveform, Hot Cues and source phrases. Choose whether to ignore that revision, keep it out of Lumi or replace the Lumi source data. Lumi-owned phrases remain separate from source phrases.
A USB beatgrid or audio revision can invalidate earlier phrase alignment. Review changed tracks before a show.
3. Prepare tracks
Open Library → Tracks and select a track to load it in Track Editor.
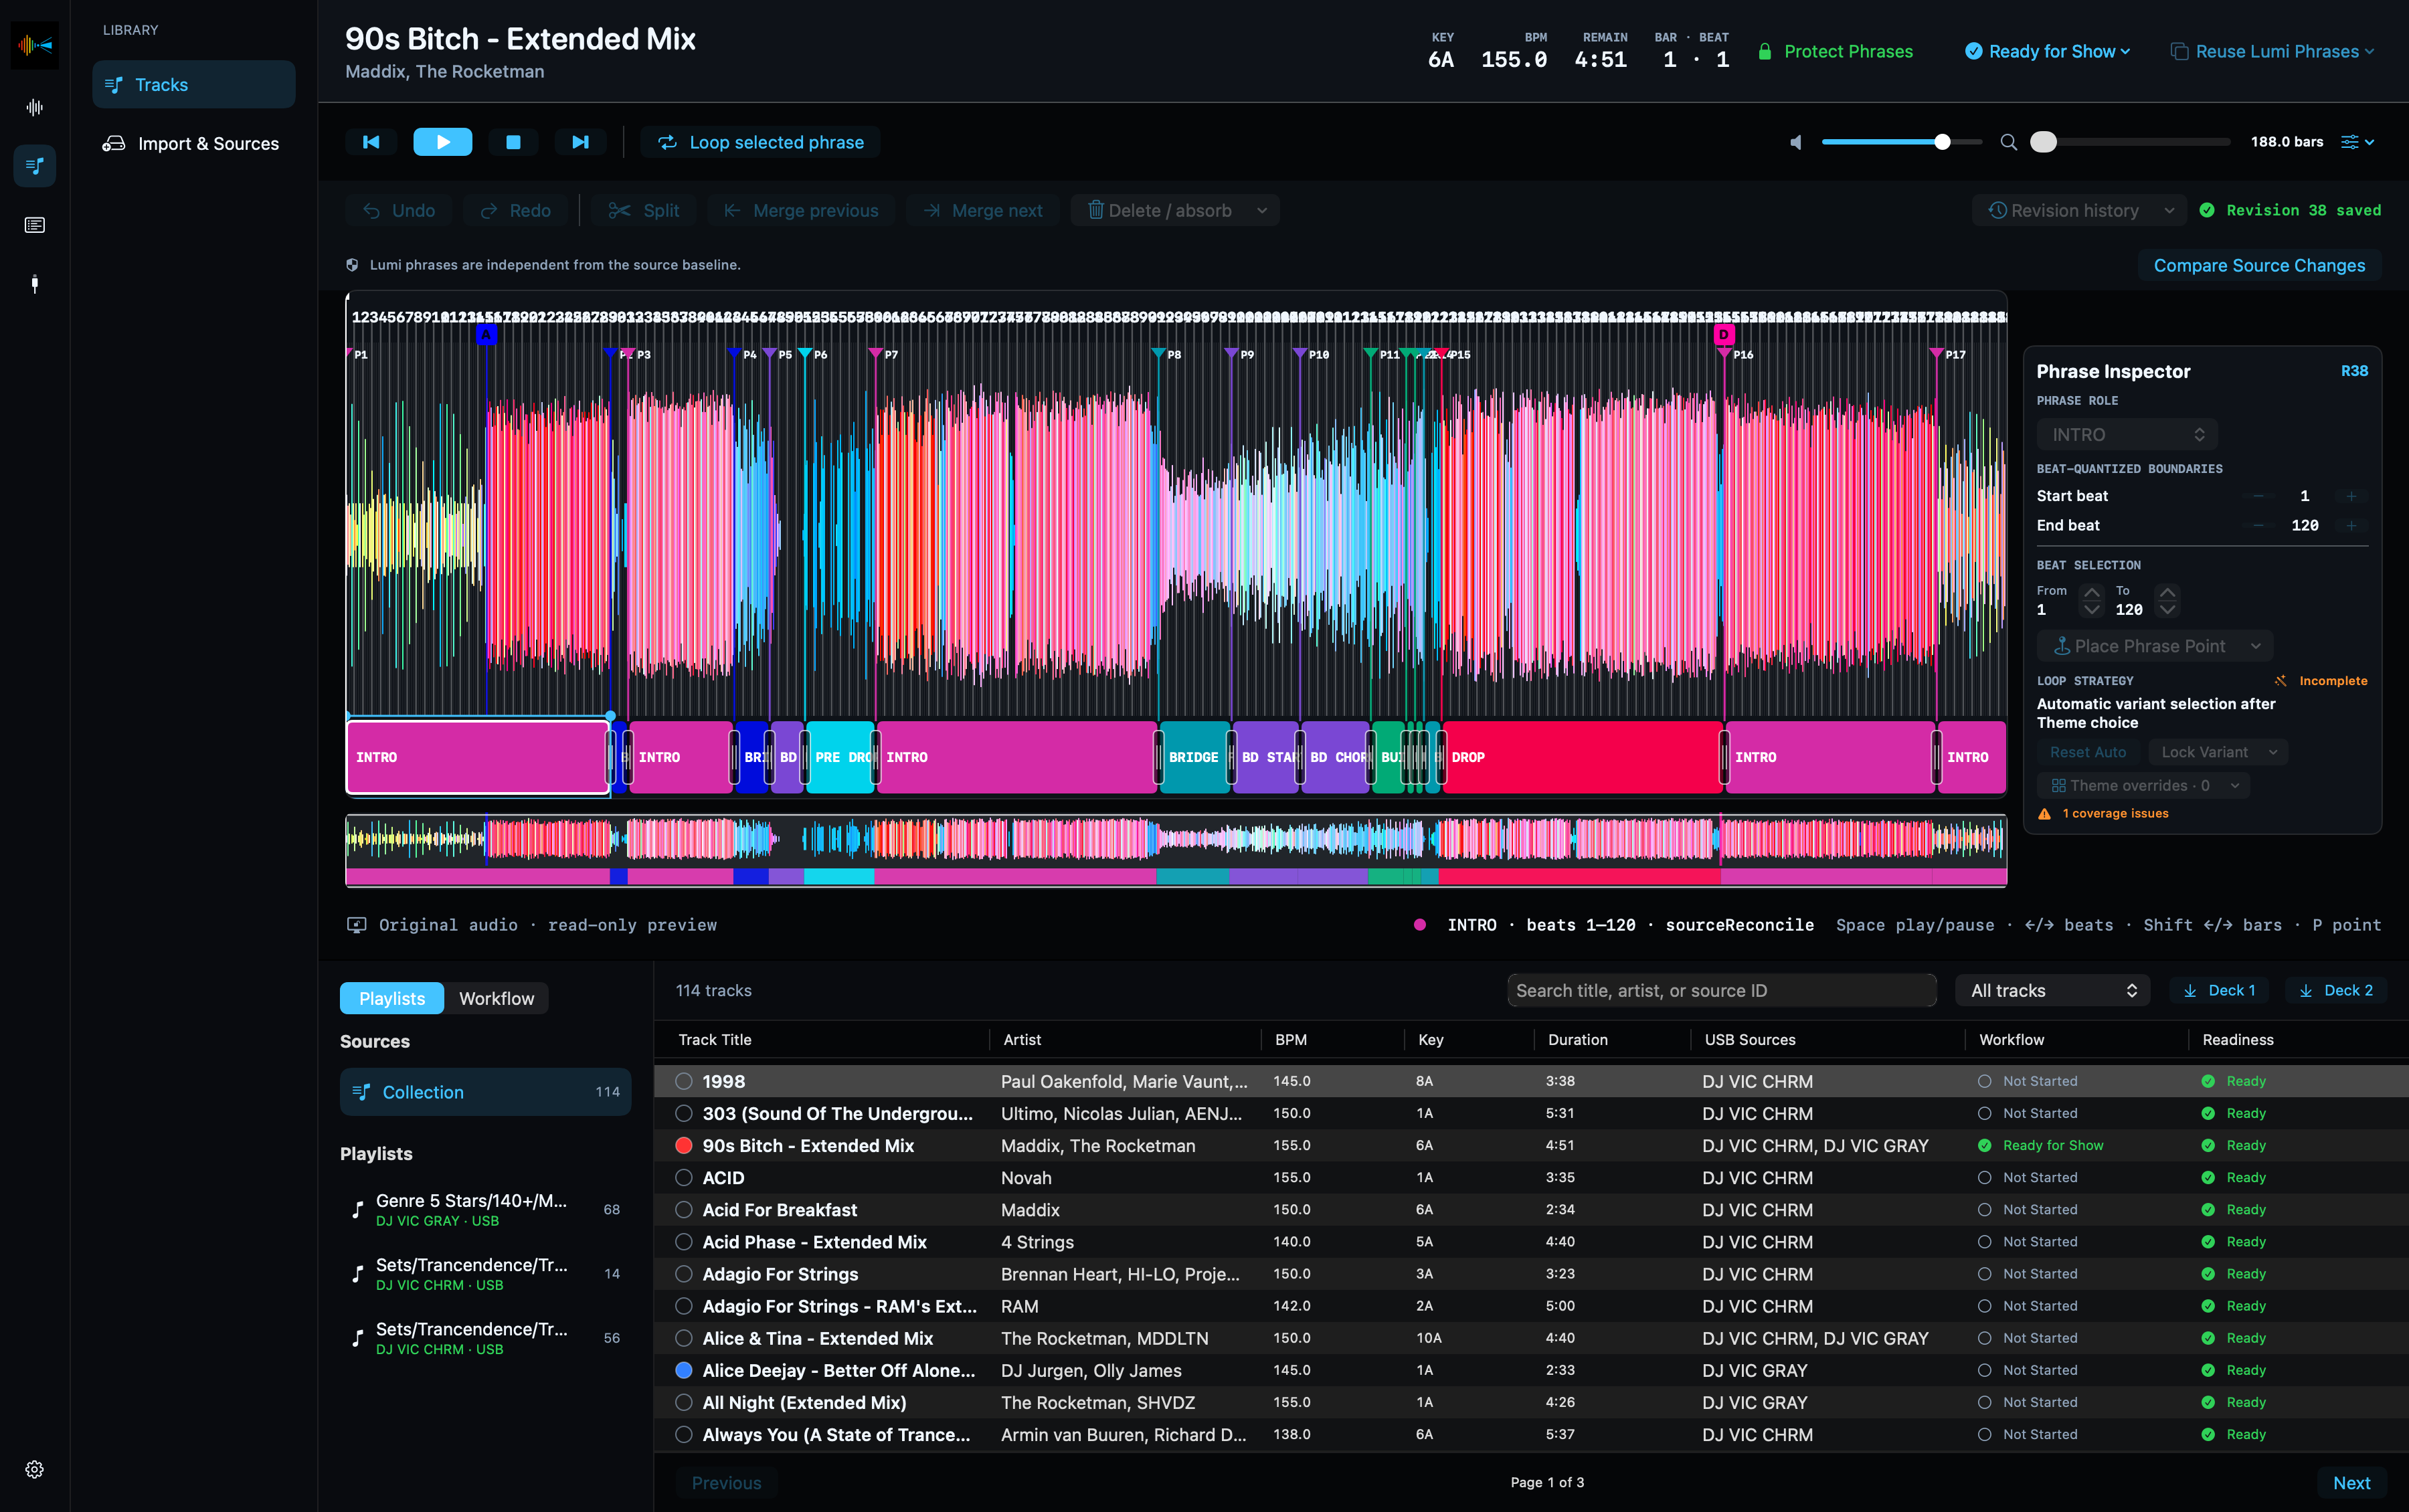
The detailed waveform is the editing surface. Zoom and scroll to a beat, place a phrase point and choose its Phrase Role. A phrase continues until the next point or the end of the track. Boundaries quantize to whole beats.
Use the preparation workflow beside Playlists to keep work organized:
- Not Started and In Progress collect unfinished tracks.
- Ready for Show marks a checked track with a green status.
- Changed after USB sync contains prepared tracks whose source analysis changed and needs another review.
- Protect Phrases prevents accidental Lumi phrase edits or replacement; intentional USB beatgrid, waveform and cue updates can still be reviewed.
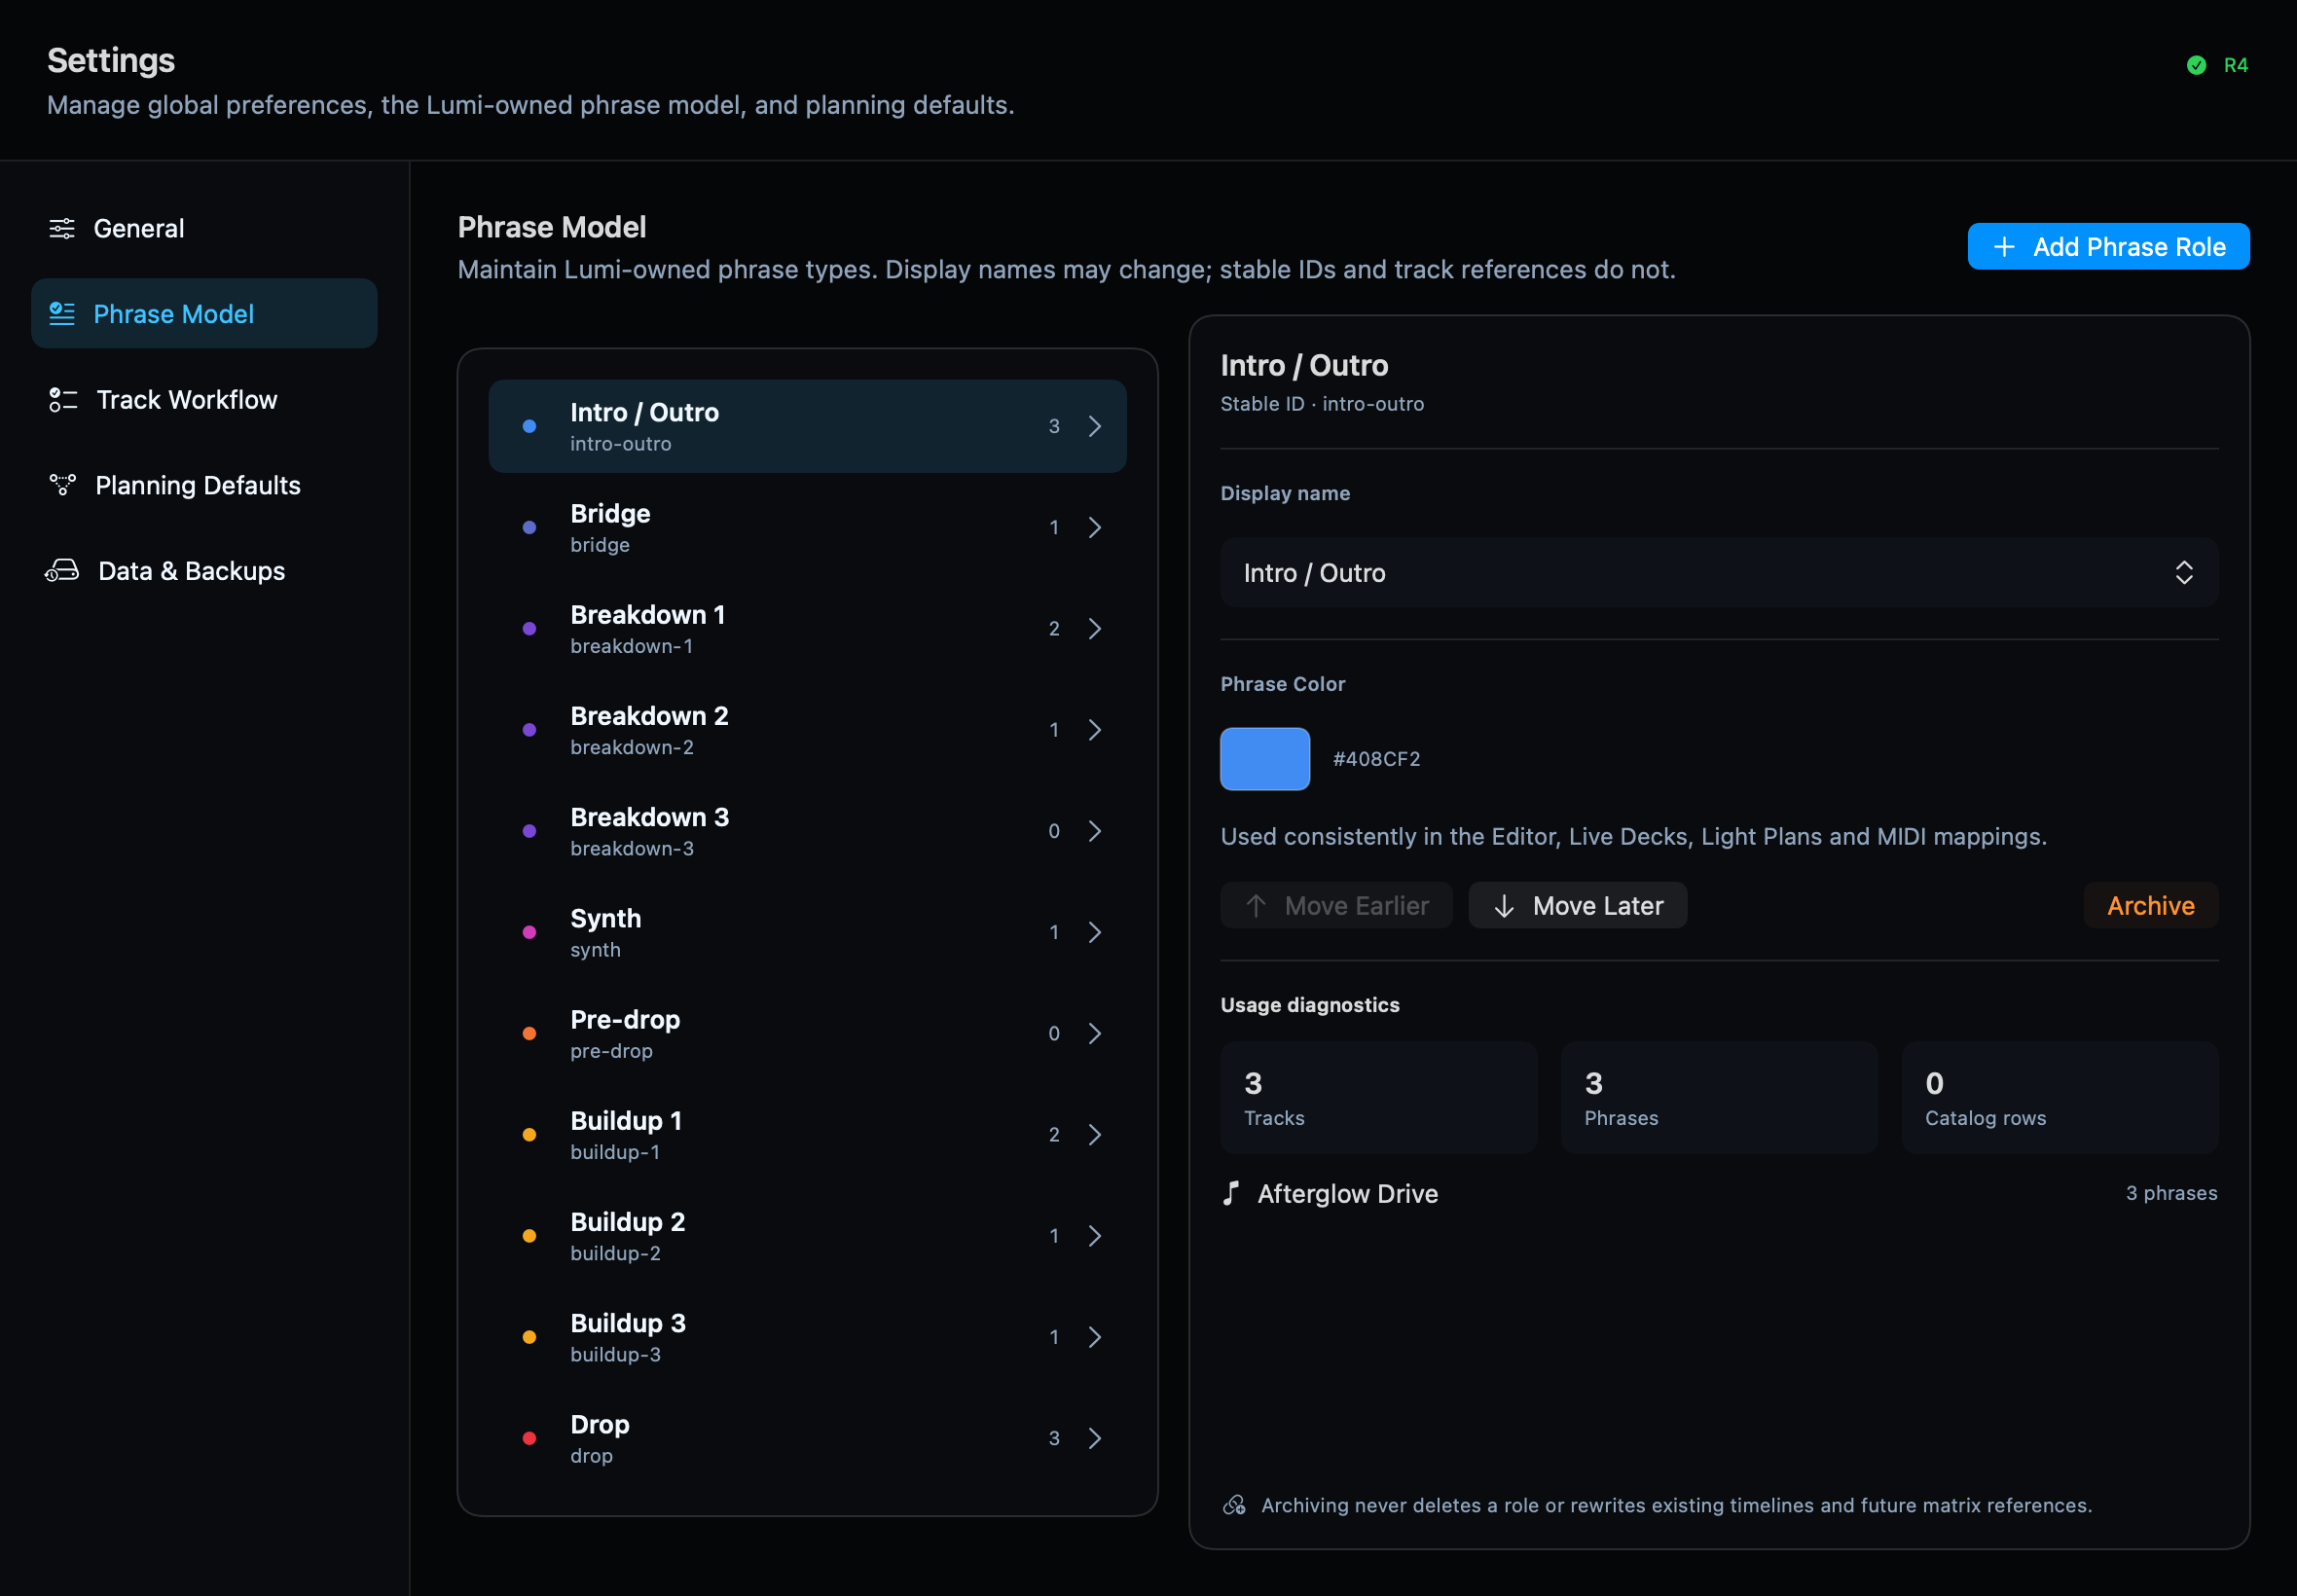
Workflow steps and Phrase Role colors can be adjusted in Settings. The same phrase colors are used throughout Library, Live, Light Plans and mappings.
4. Configure SoundSwitch output
Open Integrations → Lighting Outputs.
Banks and AutoLoops
Lumi treats the four SoundSwitch Banks as four physical collections of 32 AutoLoop slots. Name each Bank and each AutoLoop exactly as you recognize them in your SoundSwitch show.
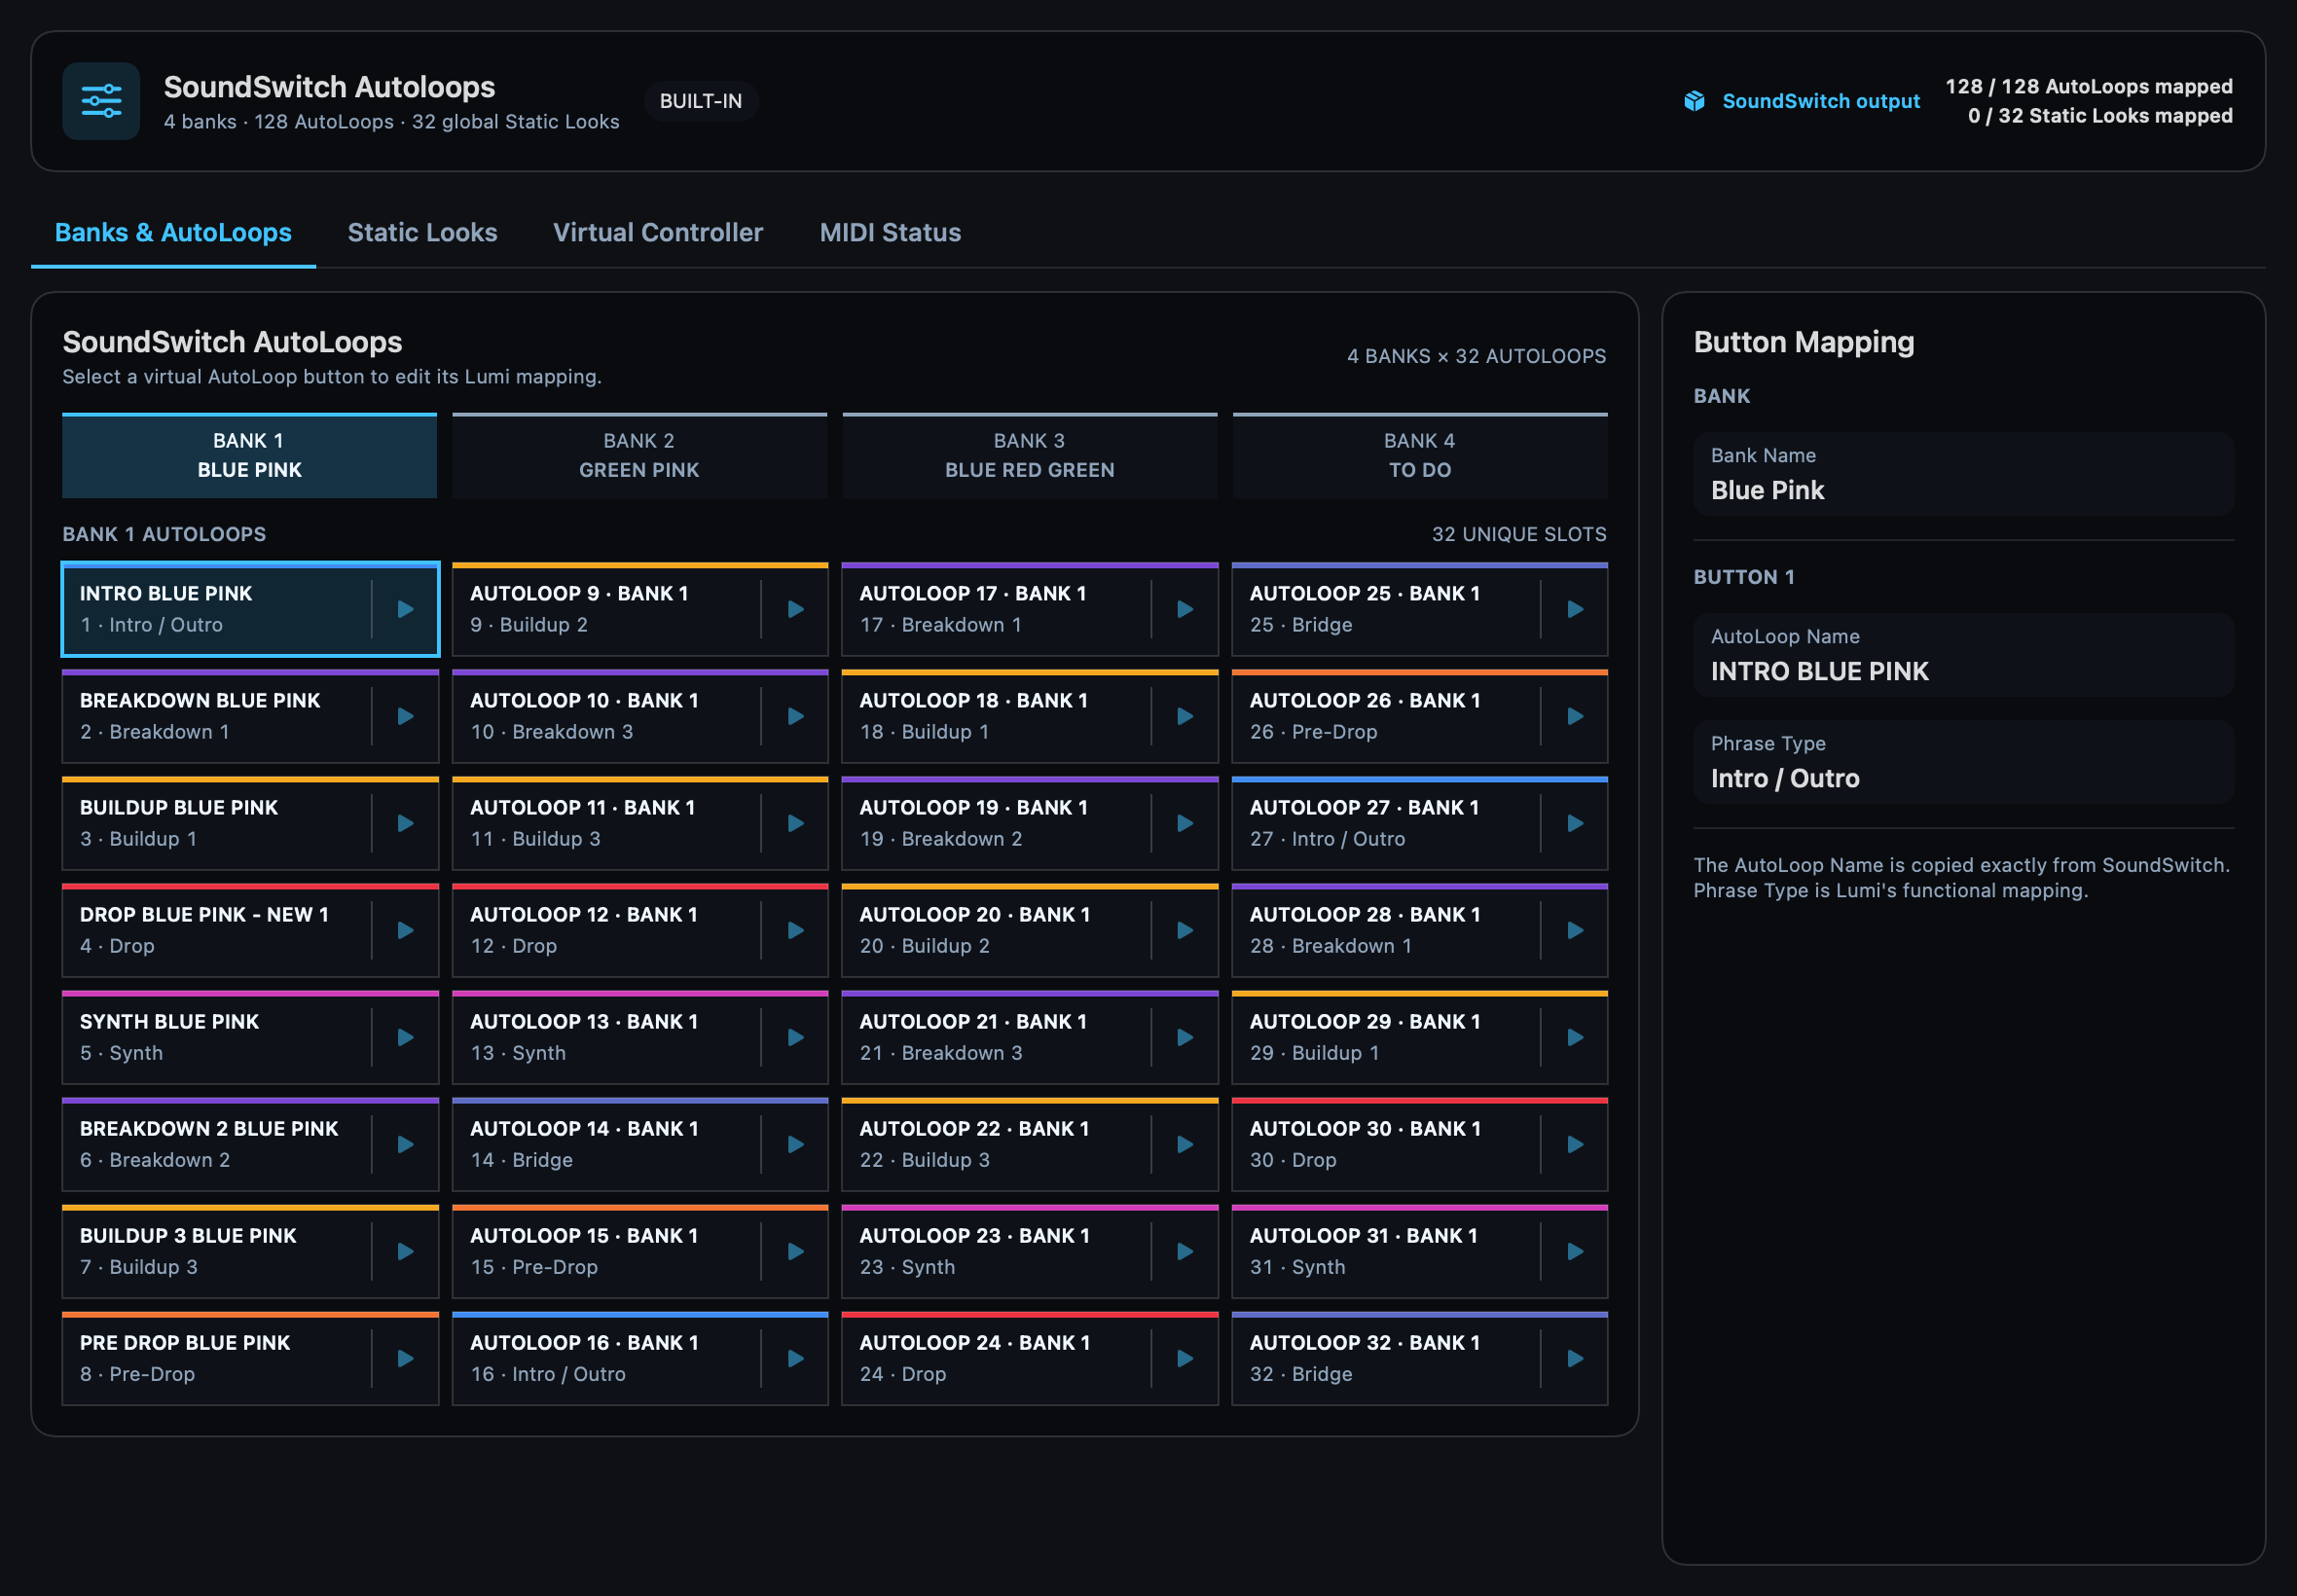
Use Virtual Controller for MIDI learn:
- Start Lumi’s virtual MIDI source.
- In SoundSwitch, enable MIDI learn for the target Bank or AutoLoop button.
- Send the matching Lumi learn pulse.
- Finish MIDI learn in SoundSwitch.
- Use the per-slot test action to confirm that the correct button responds.
Map every Bank and AutoLoop to its own MIDI address. Mapping one address across several Banks makes SoundSwitch respond ambiguously.
Static Looks
Static Looks use the same guided learn and test workflow. SoundSwitch exposes 32 global slots. A verified look can be included in a Light Plan, and Lumi changes it only when the compiled desired look changes. Automatic execution stays off for an unverified mapping.
Only one mapped Static Look is expected to be active at a time in the current SoundSwitch workflow.
5. Configure Light Plans
Open Light Plans.
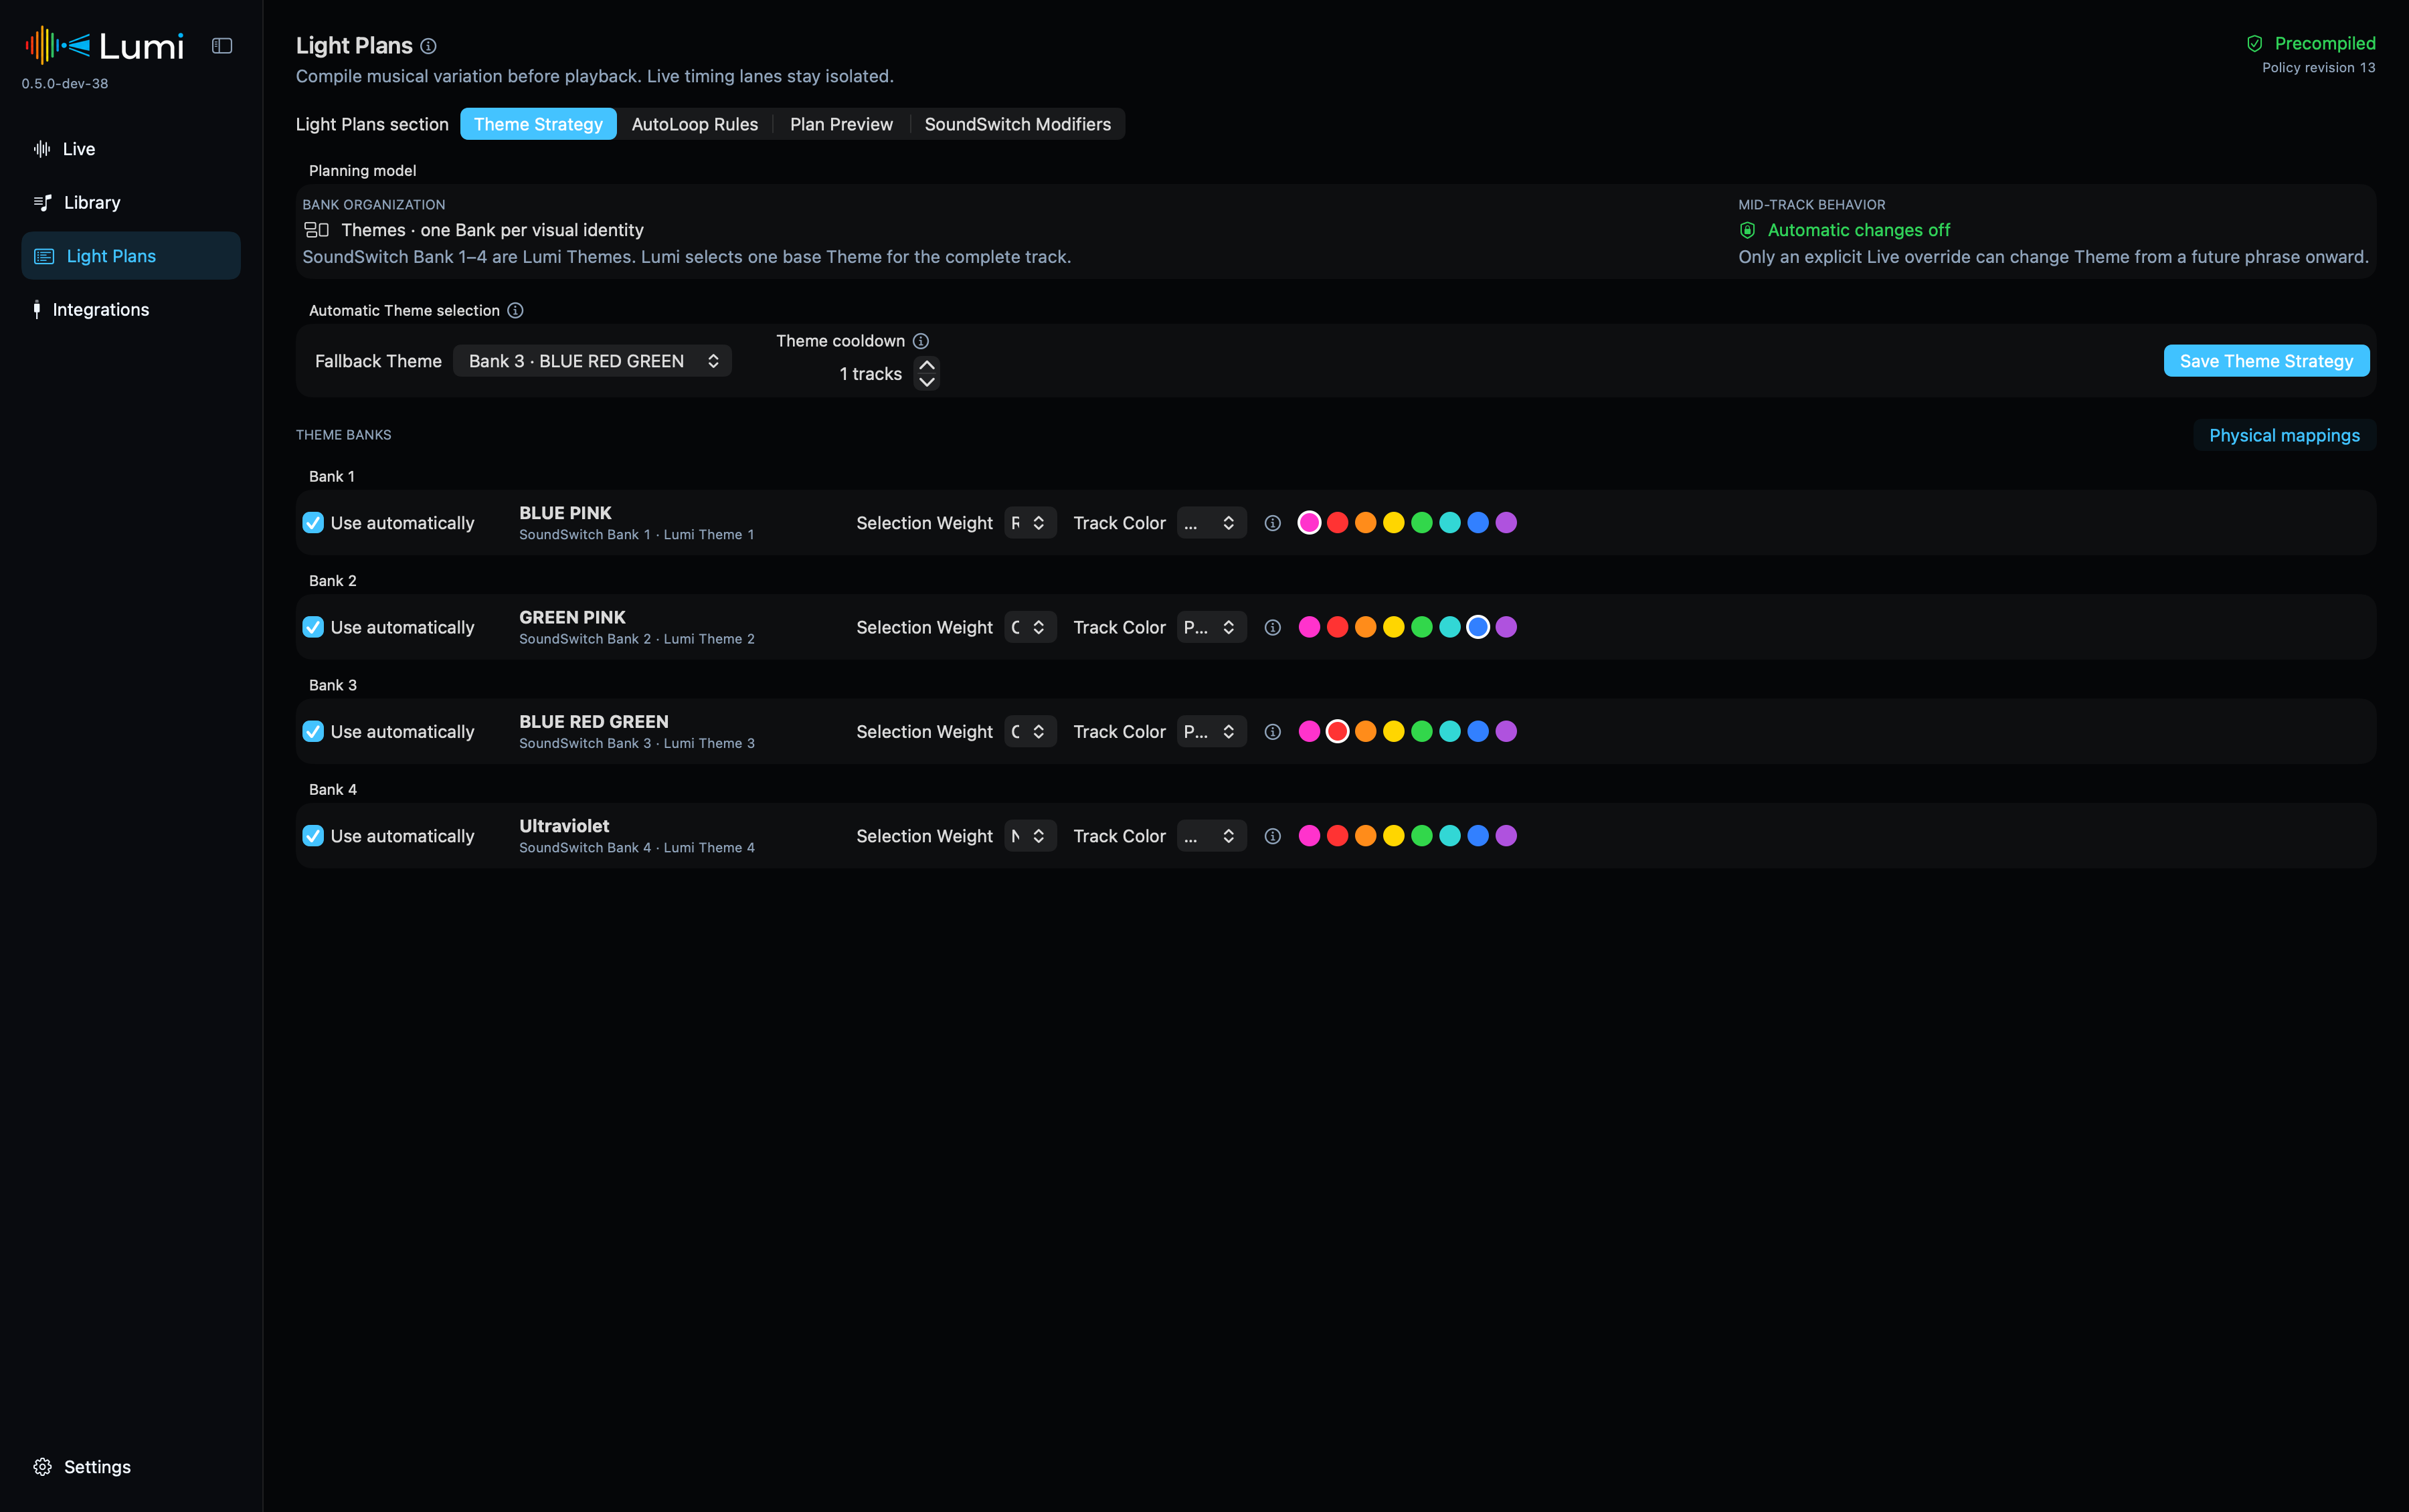
The main concept is simple: Lumi chooses one SoundSwitch Bank as the base Theme for a track, then selects AutoLoops from that Theme for each Phrase Role. Automatic phrase changes do not jump between Themes. You can deliberately override a future phrase from Live view.
For each Theme you can configure:
- its user-facing name;
- whether it is eligible for automatic planning;
- its selection weight;
- Track Color behavior: Neutral, Prefer or Only;
- the Phrase Roles and AutoLoops available in that Theme.
Repeat protection considers recent tracks and the already reserved next-track plan. This avoids using the same Theme for every consecutive track. If all valid Themes are inside the cooldown, Lumi relaxes the restriction deterministically instead of producing no plan.
Use Automatic Plan Preview before a show. It displays the chosen Theme, selection reason and complete phrase-to-AutoLoop sequence. A Phrase Role without a valid mapping is a visible no-op: Lumi leaves the active AutoLoop running and does not silently choose a different role or Theme.
Track Color is optional. Tracks without a color can still use eligible Neutral and Prefer Themes.
6. Connect the live integrations
Open Integrations and check three independent lanes:
- Pro DJ Link discovers compatible players and mixers and supplies deck state. Lumi listens read-only and does not control a player.
- Ableton Link sends the current master BPM to SoundSwitch. It does not carry phrases or lighting commands.
- Lighting Output sends mapped MIDI button actions to SoundSwitch. It does not control the SoundSwitch playback timeline.
SoundSwitch should show one Ableton Link peer when Lumi’s Link relay is enabled. Choose the Lumi MIDI source as SoundSwitch’s MIDI input. Your physical Control One can remain connected and usable beside Lumi.
7. Run a show
Open Live and choose a mode:
- Live Decks follows the players discovered through Pro DJ Link.
- Local Playback loads tracks from the Lumi Library for preparation and dry runs.
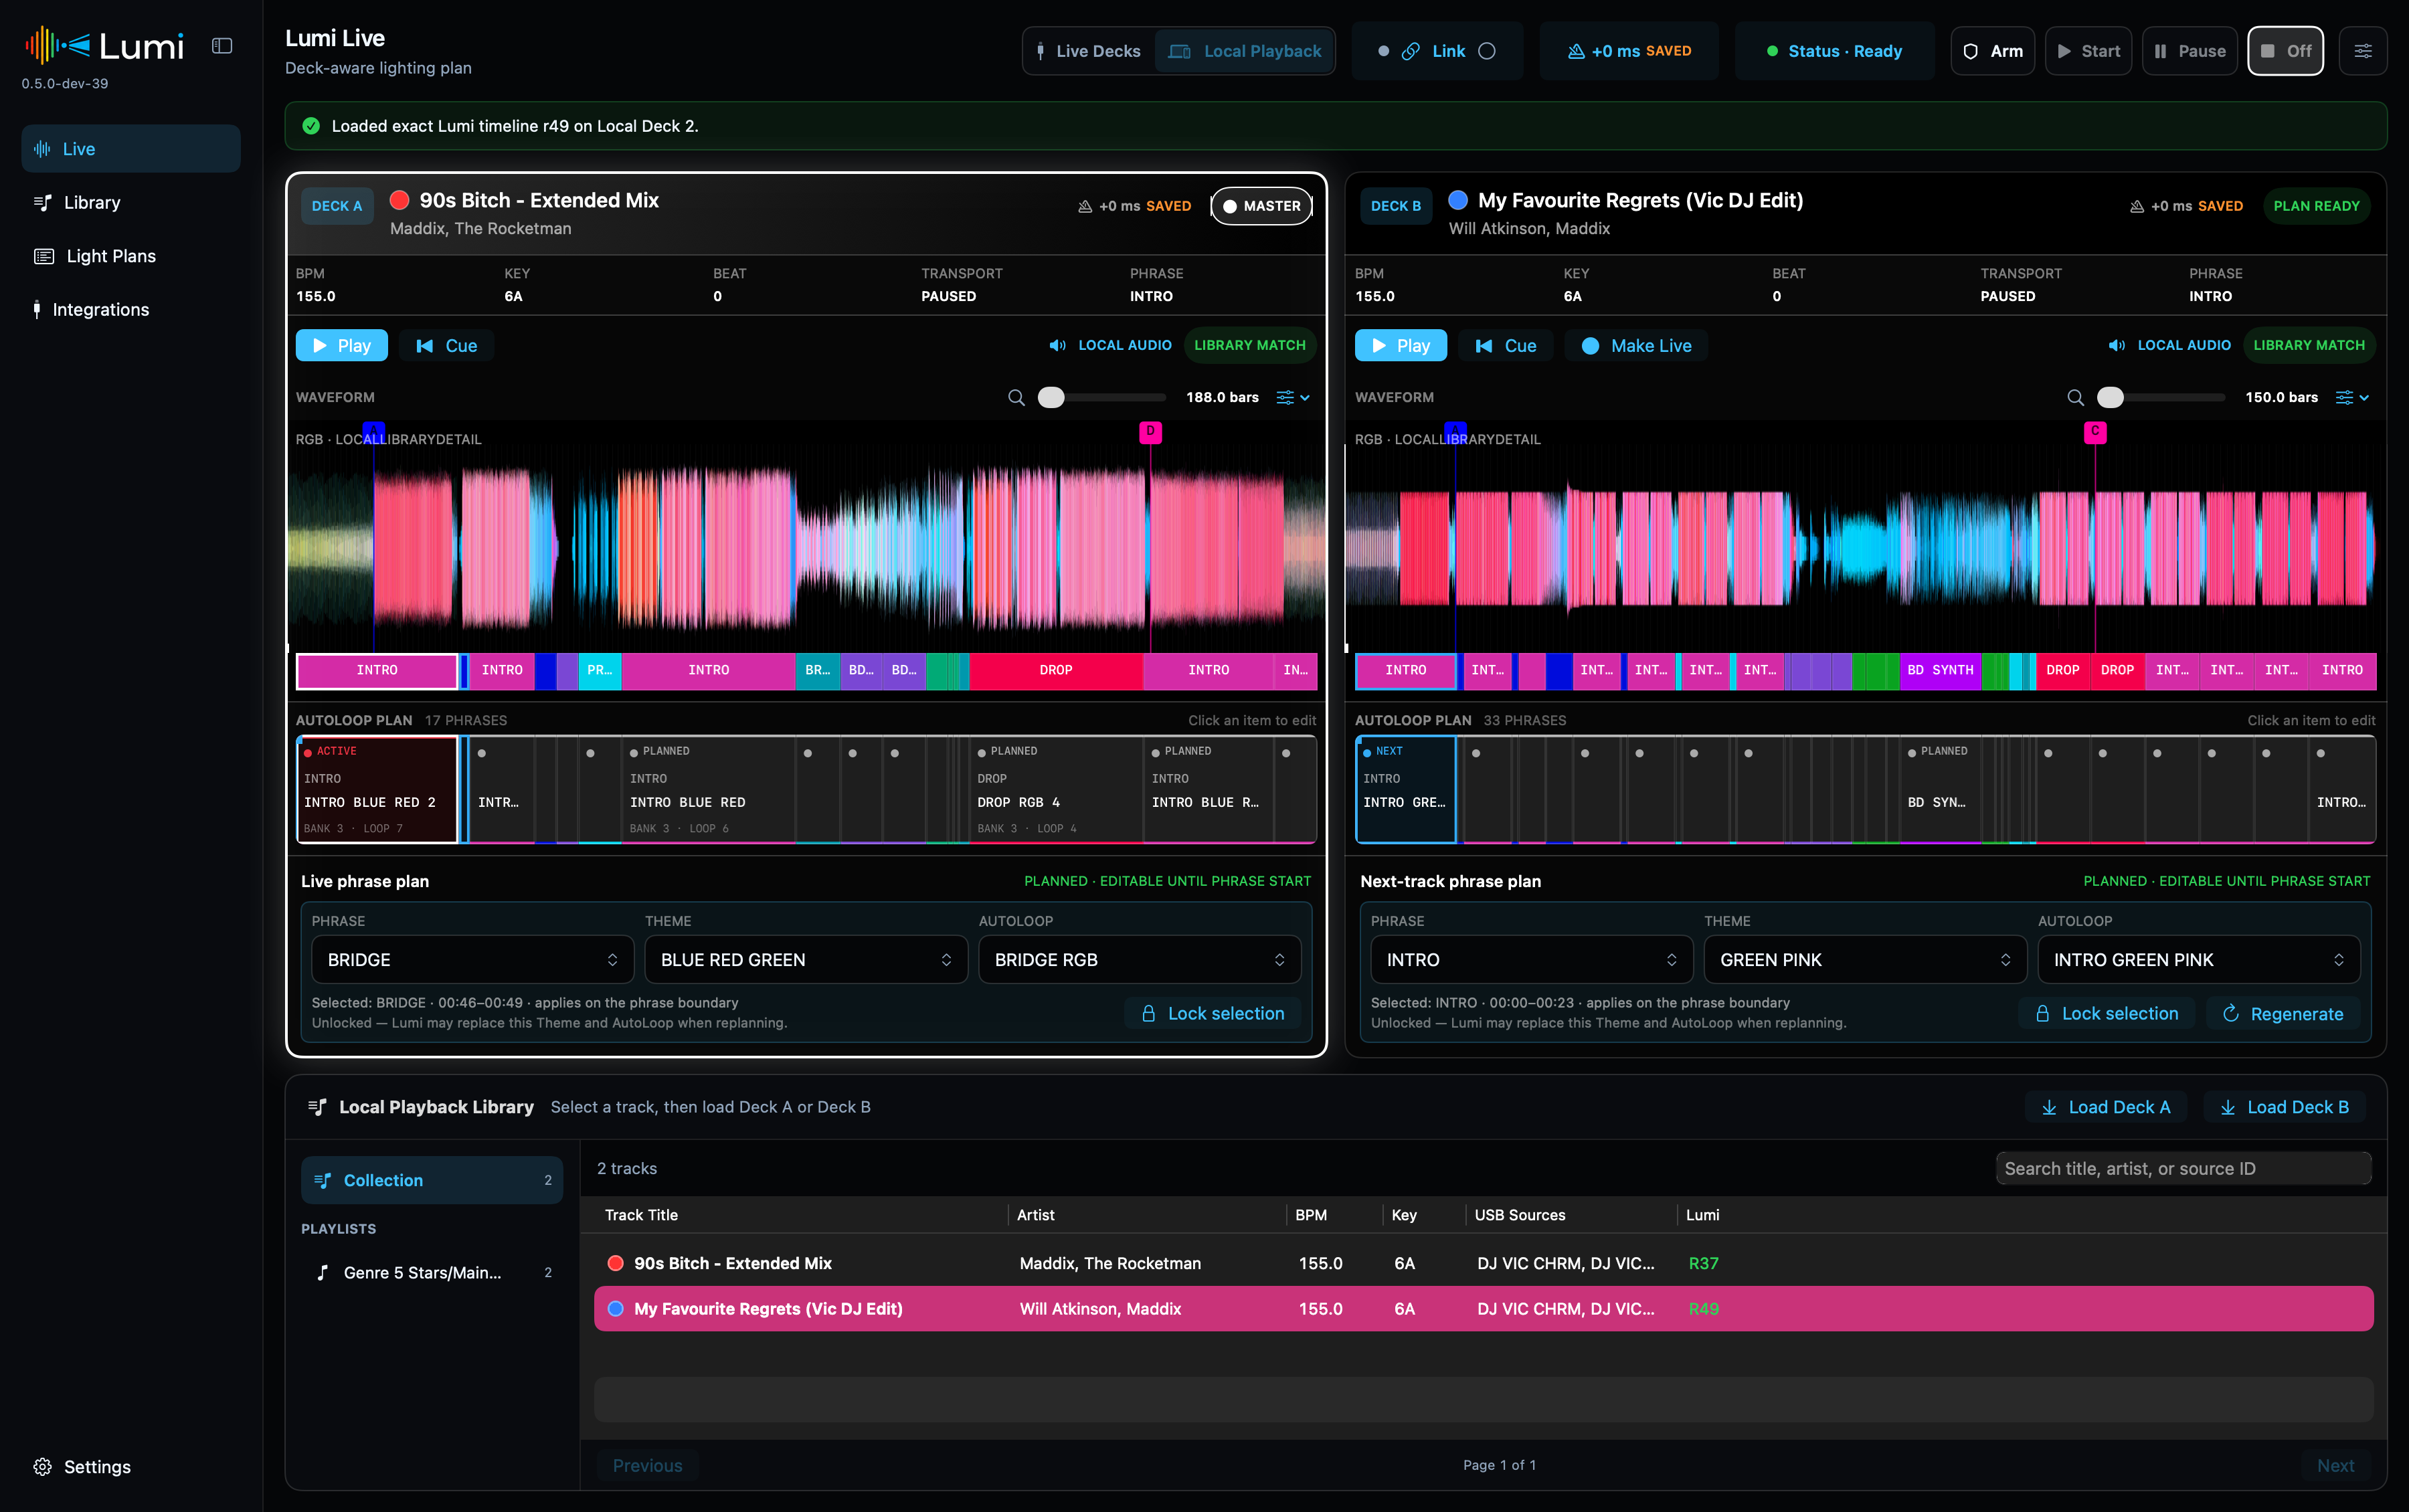
The two deck surfaces show the actual waveform, Hot Cues, Lumi phrases and the compiled AutoLoop plan. The master moves between Player 1 and Player 2 with the DJ setup. A loaded non-master track can be reviewed and adjusted before it becomes live.
Operation states
| State | Behavior |
|---|---|
| Off | No show output. |
| Arm | Read decks and compile plans, but send no lighting MIDI. |
| Start | Send the planned Bank, AutoLoop and verified Static Look actions. |
| Pause | Keep state visible, but suspend new automatic lighting actions. |
For the start of a set, load and cue the first track, choose Arm, then Start. When playback begins, Lumi selects the phrase at the actual landing position and triggers its prepared lighting action. Hot Cues and Beat Jumps are treated as transport changes: the old forecast is discarded and the landing phrase becomes authoritative.
You can change the Theme or AutoLoop for a future phrase until that phrase has started. Changes to the currently active or completed phrase are intentionally locked.
Lighting timing offset
The subtle timing control in Live compensates for a consistent delay in the SoundSwitch, MIDI or fixture chain:
- a negative value sends the action earlier;
- a positive value sends the action later;
0 msuses the measured phrase boundary.
Adjust this only after testing the complete output chain. A change during a show becomes active at the next phrase boundary, so it cannot disturb the AutoLoop that is already running.
8. Back up and rebuild safely
Use Lumi’s data tools before a release upgrade or major library cleanup. Keep separate backups for:
- the Track Library and source analysis;
- Lumi phrases and preparation state;
- configuration, Phrase Roles and workflow;
- Lighting Outputs and Light Plans.
A clean library rebuild can remove imported tracks while preserving creative phrase data and output configuration. When a new edit or mashup replaces an old track, Lumi can propose phrase reuse only when the total beat count matches exactly. It does not stretch or guess phrase boundaries.
Troubleshooting
A track is not recognized on a live player
- Confirm that the USB source used by the player is trusted and synchronized.
- Refresh the source and check the track-level impact or review state.
- With Strict USB Matching enabled, synchronize every USB source you use during the show.
- Confirm that the current audio revision, beatgrid and source identity match the Lumi Library.
A track has no Light Plan
- Check that it has valid Lumi phrases.
- Confirm that the selected Theme has an exact mapping for the opening Phrase Role.
- Check Theme eligibility, Track Color
Onlyrules and verified output slots. - Open Automatic Plan Preview for the exact selection reason.
SoundSwitch receives BPM but no AutoLoops
- Confirm that Live operation is Start, not Arm or Pause.
- Check that the virtual MIDI source is running and selected in SoundSwitch.
- Test the intended Bank and AutoLoop slots from Lighting Outputs.
- BPM and AutoLoop output are separate integrations; a green Link connection does not prove MIDI mapping.
macOS blocks or cannot open Lumi
- Confirm that the Mac is Apple Silicon and runs macOS 15 or newer.
- Download the DMG again from the official release and verify its checksum.
- Repeat the System Settings → Privacy & Security → Open Anyway step.
Before reporting an issue
Record the Lumi version, macOS version, player/mixer models, SoundSwitch version and the smallest reproducible sequence. Do not attach music, USB databases, SoundSwitch projects, tokens or other private data to a public issue.
Report reproducible problems through GitHub Issues.